Hi everyone! I hope you had a chance to start making your GUIs by using the guidance in the previous post. We have seen how to create GUI by using NetBeans functions without writing codes. However, as coders, it is good to know how to create GUIs with codes and understand the functions of swing containers and components. In this post, I will go through a few simple examples to show you how to create containers and make different arrangements of components through coding.
Example1: Utilising BorderLayout with JFrame and JBotton. BorderLayout is the default layout for JWindow, JFrame, JDialog, JDesktopPane, and JInternalFrame. It allows components in five directions; NORTH, SOUTH, EAST, WEST, and CENTER. Default is CENTER.
After you run your code, this is how the end result should look like as a GUI:

GUI coding is like the following, go and try it!
package GUI_mainExample;
import java.awt.BorderLayout;
import javax.swing.JButton;
import javax.swing.JFrame;
public class GUI_main {
private JButton c1, c2, c3;
public GUI_main() {
//initialize components privately
initComponents();
}
//declare labels
private void initComponents() {
c1 = new JButton(“CAKE”);
c2 = new JButton(“BANANA”);
c3 = new JButton(“APPLE”);
//create a frame to contain components and name it
JFrame format = new JFrame(“First GUI coding”);
//give the size of container
format.setBounds(100, 50, 600, 300);
format.setDefaultCloseOperation(JFrame.EXIT_ON_CLOSE);
//to open container in center on screen
format.setLocationRelativeTo(null);
//Place all components
format.add(c1, BorderLayout.EAST);
format.add(c2, BorderLayout.WEST);
format.add(c3, BorderLayout.CENTER);
//code to make container visible
format.setVisible(true);
}
public static void main(String[] args) {
new GUI_main();
}
}
This is a snapshot from NetBeans:

Example 2: Utilising Grid layout with JBotton and JFrame. GridLayout allows arranging containers in a grid format.
After you run your coding, this is will be end results GUI:

GUI coding is like the following, go and try it!
package GUI_main;
import java.awt.GridLayout;
import javax.swing.JButton;
import javax.swing.JFrame;
public class GUI_main {
private JButton c1, c2, c3, c4;
public GUI_main() {
//initialize components privately
initComponents();
}
//declare labels
private void initComponents() {
c1 = new JButton(“CAKE”);
c2 = new JButton(“BANANA”);
c3 = new JButton(“APPLE”);
c4 = new JButton(“PEAR”);
//create a frame to contain components and name it
JFrame format = new JFrame(“Second GUI coding”);
//give the size of container
format.setBounds(100, 50, 600, 300);
format.setDefaultCloseOperation(JFrame.EXIT_ON_CLOSE);
//to open container in center on screen
format.setLocationRelativeTo(null);
format.setLayout(new GridLayout(2, 2));
//Place all components
format.add(c1);
format.add(c2);
format.add(c3);
format.add(c4);
//code to make container visible
format.setVisible(true);
}
public static void main(String[] args) {
new GUI_main();
}
}
This is a snapshot from NetBeans:

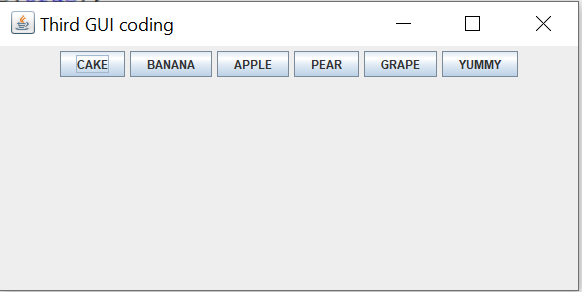
Example 3: Flowlayout with JBotton, JFrame and JPanel. FlowLayout allows container layout in a sequence.
After you run your coding, this is will be end results GUI:
GUI coding is like the following, go and try it!
package GUI_main;
import java.awt.FlowLayout;
import javax.swing.JButton;
import javax.swing.JFrame;
import javax.swing.JPanel;
public class GUI_main {
private JButton c1, c2, c3, c4, c5, c6;
public GUI_main() {
//initialize components privately
initComponents();
}
//declare labels
private void initComponents() {
c1 = new JButton(“CAKE”);
c2 = new JButton(“BANANA”);
c3 = new JButton(“APPLE”);
c4 = new JButton(“PEAR”);
c5 = new JButton(“GRAPE”);
c6 = new JButton(“YUMMY”);
//create a frame to contain components and name it
JFrame format = new JFrame(“Third GUI coding”);
//give the size of container
format.setBounds(100, 50, 600, 300);
format.setDefaultCloseOperation(JFrame.EXIT_ON_CLOSE);
//to open container in center on screen
format.setLocationRelativeTo(null);
//Create a panel container
JPanel panel = new JPanel();
//Get layout from panel
FlowLayout Layout = (FlowLayout) panel.getLayout();
//Declare how to you want layout of panel, try others; LEFT, RIGHT, LEADING, TRAILING
Layout.setAlignment(FlowLayout.CENTER);
//Place all components
panel.add(c1);
panel.add(c2);
panel.add(c3);
panel.add(c4);
panel.add(c5);
panel.add(c6);
//add panel to main container
format.add(panel);
//code to make container visible
format.setVisible(true);
}
public static void main(String[] args) {
new GUI_main();
}
}
This is snapshot from NetBeans:

Example 4: This is for fun! Smiley face 🙂
Make sure your image that you are attaching into code is under your project folder.
After you run your coding, this is will be end results GUI:

GUI coding is like the following, go and try it!
package GUI_main;
// @author kgurses
import java.awt.BorderLayout;
import java.awt.Image;
import java.net.URL;
import javax.swing.ImageIcon;
import javax.swing.JFrame;
import javax.swing.JLabel;
import javax.swing.JPanel;
public class GUI_main extends JFrame {
private final URL PIC_PATH = getClass().getResource(“Output.PNG”);
private final ImageIcon MY_PIC
= new ImageIcon(new ImageIcon(PIC_PATH).getImage().
getScaledInstance(300, 200, Image.SCALE_DEFAULT));
private JLabel imageLabel;
public GUI_main(String name) {
super(name);
this.setBounds(100, 100, 600, 300);
this.setDefaultCloseOperation(EXIT_ON_CLOSE);
this.setLayout(new BorderLayout());
imageLabel = new JLabel(MY_PIC);
JPanel Panel = new JPanel();
Panel.add(imageLabel);
this.add(Panel, BorderLayout.CENTER);
this.setVisible(true);
}
public static void main(String[] args) {
GUI_main a = new GUI_main(“DON`T FORGET TO SIMILE!!!”);
}
}
This is snapshot from NetBeans:

