The following steps will guide you on how to create a simple GUI through designing a layout, buttons, and adding text fields.
1- Create a project to store sources and project files
- Open NetBeans IDE
- Go to File > New Project or you can click on New Project icon in the
toolbar on the top of the window. It will open New project window.
- In the Categories pane, select Java and in Projects pane, choose Java Application then click on Next button.
- Type “myfirstgui” in Project Name field and specify a path by clicking on Browse… button, such an example; a project location that you created.
- Make sure you deselect Create Main Class checkbox if it is selected.
- Click on Finish button. You will see your new project name on Project window.
2-Create a Java container with JFrame
- In Projects window, right-click the “myfirstgui” node and go to New > Other tabs. It will open New File window.
- In Categories pane, choose Swing GUI Forms category, and in File Types pane, choose JFrame Form file type. Click on Next button.
- Type “myfirstguiUI” as Class Name.
- Enter my.myfirstguiUI as the package name.
- Click on Finish button. Congratulations! You created a frame like the following:

3- Add components with JPanel
- If you do not see Palette window in the upper right corner of the NetBeans IDE, choose Window > Palette.
- From the top menu, you will see Window. Go to Window >IDE tools> Palette. It will show up in the upper right corner of NetBeans IDE window like the following:

- Select a Panel from Swing Containers category and drop it onto JFrame. You will see a JPanel in Jframe.
- While JPanel is highlighted, go to Properties window on the right side of NetBeans IDE window and click the(…) button next to border to choose a border style. It will open a border window.
- In the Border dialog, select TitledBorder from the list, and type in “MyFirstGUI” as a title on the Title box. Click OK to save the changes. It will close the border window.
- You see now a JFrame that is named MyFirstGUI like the following. You can make size bigger or smaller by extracting it from corners and positioning it by dragging it into a new position:

- Go ahead and add some Jlabels, JTextFields from Palette. I made one like the following:
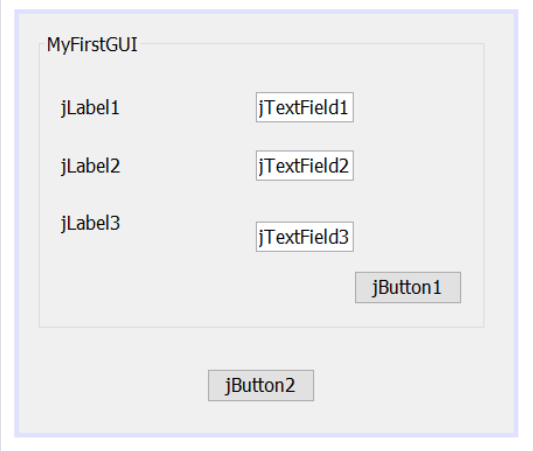
4-Rename the components that added to the JFrame
- Double-click jLabel1 and change the text property to Number 1:
- Double-click jLabel2 and change the text to Number 2:
- Double-click jLabel3 and change the text to Number 3:
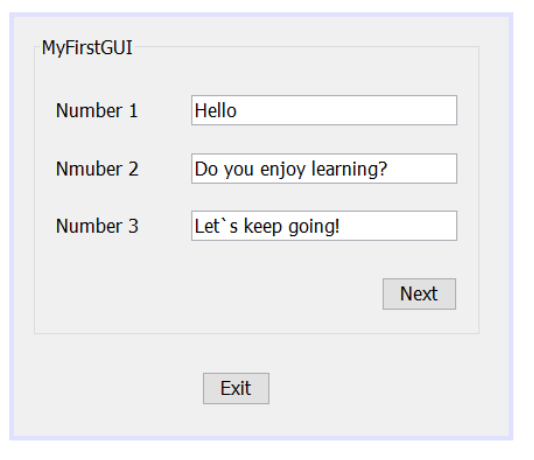
- To edit JTextField, do the right-click and select Edit Text. Delete the sample text from jTextField1 and type Hello
- If you like to resize the jTextField1, extract from corners. Repeat this step for jTextField2 and jTextField3.
- Rename the display text of jButton1 to Next and jButton2 to Exit with the same Edit Text button selection with the right client. I got the following:
This is how easy to create GUI steps without writing codes. However, it is still converted to written codes under Source like the following for the example that we created.

Please go ahead and make your new GUIs. I hope these steps will help!
