We are going to learn the basics of the CSS to support HTML documents styling. I will suggest refreshing your knowledge by revisiting my previous post, “Learning HTML” before starting to explore this post.
CSS, Cascading Style Sheets, is another markup language like HTML, and its main function to describe the style of the HTML elements displacement. CSS could be an external stylesheet so it allows you to create multiple displacements for an HTML web site and give you flexibility to select the different styles on the same page. I will explain how in the following.
If you want to create a web page, simply remember this, HTML describes the content of the web page and CSS helps to style it.
Important terms to know
When you are writing codes of CSS, there are two terms;
Selector: This finds the HTML element that you want to style
Declaration block: One or more declarations with properties and values that you want to specify for the required style. Each declaration has property and value by semicolon separation and multiple declarations separated by colons. Example;
h1 { color: blue; text-align: center;}
Selector {property:value;property:value}
Different Selectors
There are different selector types that helps you to select HTML elements;
1- Select elements based on their name
Example:
h1 { color: blue; text-align: center;}
2- Select elements based on their id attribute (specified unique id for HTML element)
“#” character follows with an id.
Example:
#allheaders {
background-color: white;
color: darkblue;
padding: 20px;
text-align: center;
}
3- Select elements based on their class attribute
“.” character follows with an id.
Example:
.center {
text-align: center;
color: blue;
}
4- Select elements based on universal selector
“*” character to select all HTML elements.
Example:
*{
text-align: center;
color: blue;
}
5- Select elements based on grouping
Example:
P, h1, h2, h3 {
text-align: center;
color: blue;
}
Different ways of adding CSS
There are three ways to add CSS into HTML documents;
1- External CSS: This allows to create an external file with style codes(it is also called style sheet), and needs to be linked with a <link> element in HTML documents. The extension of external CSS file is *.css. If you have an external CSS file, you can use it to style any HTML web page. Make sure you save both of HTML and CSS files in the same folder.
Example:
External CSS file (named and saved as “style.css”)
body {
background-color: lightgreen;
}
h2 {
color: black;
margin-left: 40px;
}
In HTML file (how to link external CSS file)
<!DOCTYPE html>
<html>
<head>
<link rel=”stylesheet” href=”style.css”>
</head>
<body>
<h2>Today’s mood</h2>
<p>Today, I feel happy and fresh.</p>
</body>
</html>
2- Internal CSS: This is an internal style code for an HTML web page that you are working on.
It will be under the <head> section and <style> element. This will be my focus for this post.
Example:
<!DOCTYPE html>
<html>
<head>
<style>
body {
background-color: lightblue;
}
p {
color:black;
text-align:center;
}
h1 {
color: red;
margin-left: 20px;
}
</style>
</head>
<body>
<h1>Today’s mood</h1>
<p>Today, I feel happy and fresh.</p>
</body>
</html>
3- Inline CSS : This is a unique style for a single element. I touched on this in my last post, “ Learning HTML”.
Example:
<!DOCTYPE html>
<html>
<body>
<h1 style=”color:red;margin-left: 20px;”>Today’s mood</h1>
<p style=”color:black;”>Today, I feel happy and fresh.</p>
</body>
</html>
Adding a comment
A comment of CSS will be inside the <style> HTML element and will start with /* and finish with */
Example:
<!DOCTYPE html> /* This is the tag for starting an HTML document */
Background color and transparency
Background;
You can have different colors for the background of the whole page, title, or paragraph.
Property is the “background-color” and value is any color you will select.
Example:
body {
background-color: yellow;
}
h1 {
background-color: maroon;
}
p {
background-color: lightblue;
}
Transparency;
Property is “opacity” and the value from 0.0 to 1.0
Example:
body {
background-color: yellow;
opacity: 0.4;
}
Creating border and its properties
Property is “border-style” and value could be dotted, dashed, solid, double,…etc. I will show different values with the following;
Example:
<!DOCTYPE html>
<html>
<head>
<style>
p.first {border-style: dotted;}
p.second {border-style: dashed;}
p.third {border-style: solid;}
</style>
</head>
<body>
<h1 style=”color:red;margin-left: 20px;”>Today’s mood</h1>
<p style=”color:black;”>Today, I feel happy and fresh.</p>
<p class=”first”>Sun is bright.</p>
<p class=”second”>Life is fun.</p>
<p class=”third”>New day is a new start.</p>
</body>
</html>
Table 1- Some of other commonly used styling properties and example values

Example, formatting title and adding border and outline:
<!DOCTYPE html>
<html>
<head>
<style>
p {
color:darkblue;
font:24px italic bold Arial;
margin:20px;
background:lightblue;
border: 2px solid black;
outline: 2px solid red;
outline-offset: 10px;
}
</style>
</head>
<body>
<p>Today, I feel happy and fresh.</p>
</body>
</html>
Example, making a table:
<!DOCTYPE html>
<html>
<head>
<style>
table, td, th {
border: 2px double maroon;
}
table {
width: 70%;
}
th {
height: 40px;
}
</style>
</head>
<body>
<h2>The names and ages list</h2>
<table>
<tr>
<th>Date</th>
<th>Name</th>
<th>Age</th>
</tr>
<tr>
<td>25-Jan-2021</td>
<td>Alex</td>
<td>17</td>
</tr>
<tr>
<td>25-Jan-2021</td>
<td>John</td>
<td>21</td>
</tr>
</table>
</body>
</html>
Making a list
In HTML, there are two types of list tags.
1- Unordered, with bullets, <ul>…..</ul>
2- Ordered, with numbers or letters, <ol>……</ol>
In CSS, property is “list-style-type” to specify the marker style; either as a shape or roman number or letter. Example shows two different ways of setting bullets for the lists named as 1 & 2.
Example:
<!DOCTYPE html>
<html>
<head>
<style>
ul.1 {
list-style-type: circle;
}
ol.2 {
list-style-type: lower-alpha;
}
</style>
</head>
<body>
<h2>Different type of bullets for lists</h2>
<p>List with circle bullet:</p>
<ul class=”1″>
<li>Apple</li>
<li>Pear</li>
<li>Banana</li>
</ul>
<p>List with the lowercase letter bullets: </p>
<ol class=”2″>
<li>Apple</li>
<li>Pear</li>
<li>Banana</li>
</ol>
</body>
</html>
Links formatting
There are four different statements we can have for a link. The order is important to honor. Which are;
“a:link” unvisited link
“a:visited” visited link
“a:hover” mouse over it link
“a:active” clicked link
Example:
<!DOCTYPE html>
<html>
<head>
<style>
a:link {
color: red;
}
a:visited {
color: green;
}
a:hover {
color: hotpink;
}
a:active {
color: blue;
}
</style>
</head>
<body>
<h1>Link styling</h1>
<p><b><a href=”https://123codingwithme.com/”>123codingwithme </a></b></p>
</body>
</html>
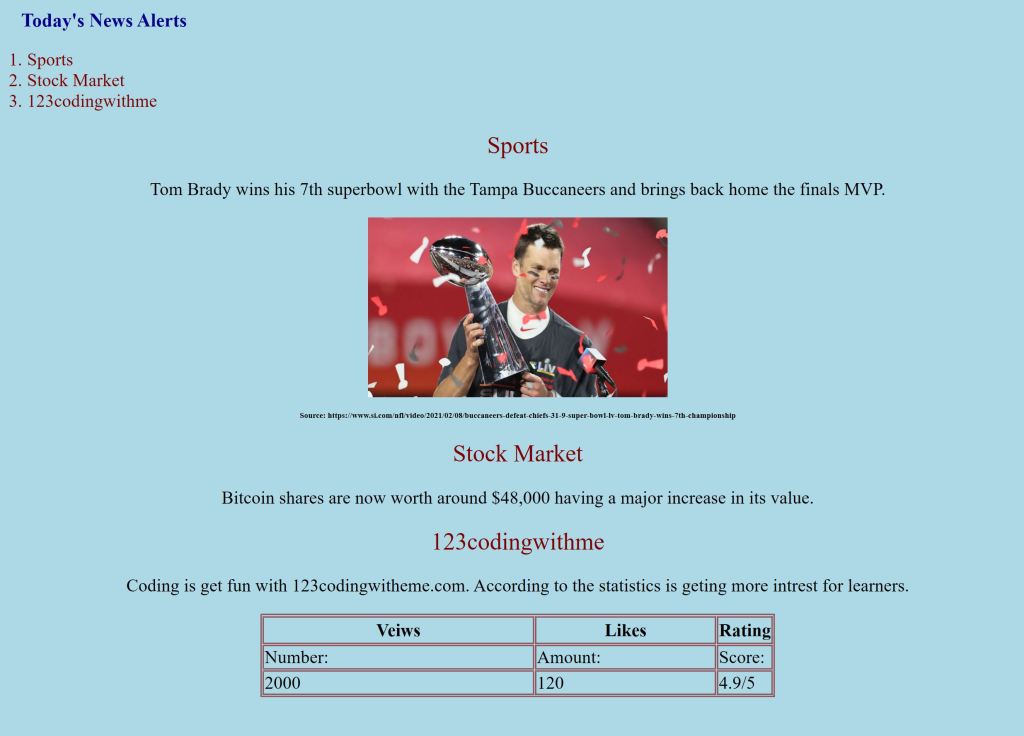
HTML Project with CSS
I compiled a HTML document with CSS to show you how to utilize some of the commonly used CSS properties and values to style a simple website. You can find it under projects from the menu. When I open my HTMLprojectwithCSS.html file in any web browser, it looks like following;

Kudos
LikeLiked by 1 person