Hi! We are going to learn our first coding program!
In my other post “Brief History of Coding”, I gave you a summary of three different types of languages; programming, scripting and markup languages. In this post, I will be focusing on one of the markup languages, HTML. It was developed by Tim Berners-Lee in the early 1990’s and it is the most popular and widely used language for web designing. Information that I am going to share through this post will help you to build a simple webpage! I hope you will enjoy learning HTML and will get the benefit out of it 🙂
What is HTML?
HTML stands for Hyper Text Markup Language and it used to create web pages. Its job is to describe the structure of the website by using a series of elements. Those elements will tell a browser ( like Google Chrome, Microsoft EDGE, FireFox etc.) how to show the written text. The elements are presented by tags. Basically tags are codes, contained in a pair of brackets. Such an example; <HTML>
You need a text editor to create your HTML documents and a browser to read & display them. There are many text editors available and I am using a Sublime Text editor. You can download this editor easily from their website, sublimetext.com. The written text file will be saved with the extension of *.html. A double click on a saved *.html file will allow you to open and display it in any web browser.
You can write the tags either in lowercase or uppercase, they are not case sensitive. However, it is recommended to write in lowercase. If you forget to write one of the tags to close, you will get syntax errors.
Important terms to know
There are few terms that you will see many times in the further section of the post and it will be good if you understand them well.
Tag: It is the roof of an HTML document. It is presented with names and will have a start and end tag. Ending tag with the same name of start tag and additional will have forward slash, “/ ” .
Element : From start tag, content, to the end tag. Some elements do not have start to end. They are called empty tags. There are also elements called nested. It means that elements have other elements.
Attributes : They are used to give additional information about the HTML tags.
Anchor: It is the hypertext that includes the source or destination to provided address or other information.
Common used tags in HTML
Document type definition <!DOCTYPE >
Starting and finishing HTML document tag <html> ……</html>
Comment writing tag <!–……….–!>
Head section
Information used to describe the data tag
<head> …..</head>
Title tag <title>……</title>
Example:
<!DOCTYPE html>
<html>
<head>
<title>This is my first HTML coding</title>
</head>
</html>
Body section
Defining document contents, such as headings, images, tables, hyperlinks, etc. tags
<body> …….</body>
Define a paragraph tag <p>……</p>
Define a level1 heading tag <h1>……</h1>
Note: headings are defined with the <h1> to <h6>
Example:
<!DOCTYPE html>
<html>
<body>
<h1>This is your heading level 1</h1>
<p>This is the first paragraph.</p>
<p>If you want to create another paragraph.</p>
</body>
</html>
Formatting
Center content horizontally tag <center>…..</center>
Underline style tag <u>……</u>
Italic style tag <em>….</em>
Bold tag <b>… </b>
Bold style indicates important text tag <strong>…..</strong>
Aligning the content either left, center or right with an align attribute, align=”….”
Italic style tag <i> ….</i>
Smaller text tag <small>…..</small>
Marked text tag <mark>…..</mark>
Deleted text <del>….</del>
Example:
<!DOCTYPE html>
<html>
<body>
<h1 align = “ center” > This is title aligned in the center</h1>
<p>This is the text I want to format</p>
<p><b>bold</b></p>
<p><i>italic</i></p>
</body>
</html>
Links
Hyperlink tag <a>….</a>
Attribute “href” allows access to the destination of a link.
Link a website address anchor tag (a tag with “href” attribute)
<a href = “website address” >…..</a>
Link to an email address anchor tag (a tag with “href” attribute)
<a href = “mailto: email address” >……</a>
Example:
<!DOCTYPE html>
<html>
<body>
<h1>123 coding with me, please visit the following link </h1>
<a href=”https://123codingwithme.com/ ”> 123codingwithme</a>
</body>
</html>
Attribute “target” indicates where to open the documents. Target attribute can be used together with one of the following;
Open the document in the same page _self
Open the document in a new page _blank
Open the document in the full body of the document _top
Example:
<!DOCTYPE html>
<html>
<body>
<h1>123 coding with me, go to posts in the following link </h1>
<a href=”https://123codingwithme.com/blog/”
target=”_blank”>123codingwithme.com</a>
</body>
</html>
Link to an image anchor tag <img>
Attributes that could be used in image tag
Source file src=”location” this give a path to an image to be displayed
Image content alt=”description of picture”
Height height =”pixels”
Width width = “pixels”
Example:
<!DOCTYPE html>
<html>
<body>
<h2>The title of paragraph </h2>
<p>Explanation about the picture, figure1:</p>
<img src=”img.jpg” alt=”the cat with blue eyes” width=”300″ height=”700″>
</body>
</html>
Page break
Line break tag <br> this is without closing tag. Example; <p> …..<br>…..</p>
Style attribute
style=”….” this is used to add style to a HTML tag such as color, font size, etc.
As we said, HTML is used to specify the data. On the other hand, the CSS helps to present the data in nice layout and design. CSS stands for Cascading Style Sheets. It is used for styling HTML color, background color, font size, font family, text alignment, and many more to display the text in a neat format.
There are three ways to add the CSS into HTML; inline, internal and external. I will focus on the inline CSS in this post. Inline CSS using the style attribute inside an HTML tag.
If you remember from the above HTML tags, we learned some of the attributes for styling, such as; <p style = “color:blue;”> here we can write this in general format, <p style = property:value;”>
Here, property and value is CSS property and value.
A few CSS properties for style attributes inside HTML tag (examples are either for a paragraph (p) or level 1 header (h1))
Background color <p style=“background-color: green;”> background is green color </p>
Text color color <h1 style=“color:blue;”> text is blue color</h1>
Font-family <h1 style=“font-family:arial;”> text is heading format</h1>
Font-size <h1 style=“font-size:150%;”> text is heading size</h1>
Example:
<!DOCTYPE html>
<html>
<body>
<h1 style=”background-color:yellow;”>Heading name with level 1 size</h1>
<h2 style=”font-family:impact;”>Heading name with level 1 size</h2>
<p style=”color:red;”> A paragraph with red color</p>
</body>
</html>
Quotations
Address tag <address>…. </address>
Short quotations <q>….</q>
Abbreviation tag <abbr>….</abbr>
Citation tag <cite>….</cite>
Example:
<!DOCTYPE html>
<html>
<body>
<address>
This is address of Alex<br>
Visit us at:<br>
smilyplace.com<br>
Wonderland<br>
USA
</address>
</body>
</html>
Language
Language attribute inside of HTML, lang=”en-us” Example : <html lang=”en-us”>
Table
Table tag <table>….</table>
Table header tag <th>….</th>
Table cell tag <td>….<td>
Row tag <tr>…..</tr>
There are some default settings for the table tags. Such as; table header bold and centered. Each cell left aligned.
Example:
<table style=”width:100%”>
<tr>
<th>Date</th>
<th>Name</th>
<th>Age</th>
</tr>
<tr>
<td>25-Jan-2021</td>
<td>Alex</td>
<td>17</td>
</tr>
<td>25-Jan-2021</td>
<td>John</td>
<td>21</td>
</tr>
List
List start tag <li>….</li>
Unordered list tag <ul>….</ul>
Ordered list tag <ol>….</ol>
Example:
<ol>
<li>Apple </li>
<li>Banana</li>
<li>Pear</li>
</ol>
Description list <dl>…</dt>
Description list- name for description <dt>…</dt>
Description list-explanation for the name <dd>….</dd>
Example:
<dl>
<dt>Apple</dt>
<dd> red sweet </dd>
<dt>Banana</dt>
<dd>large soft </dd>
</dl>
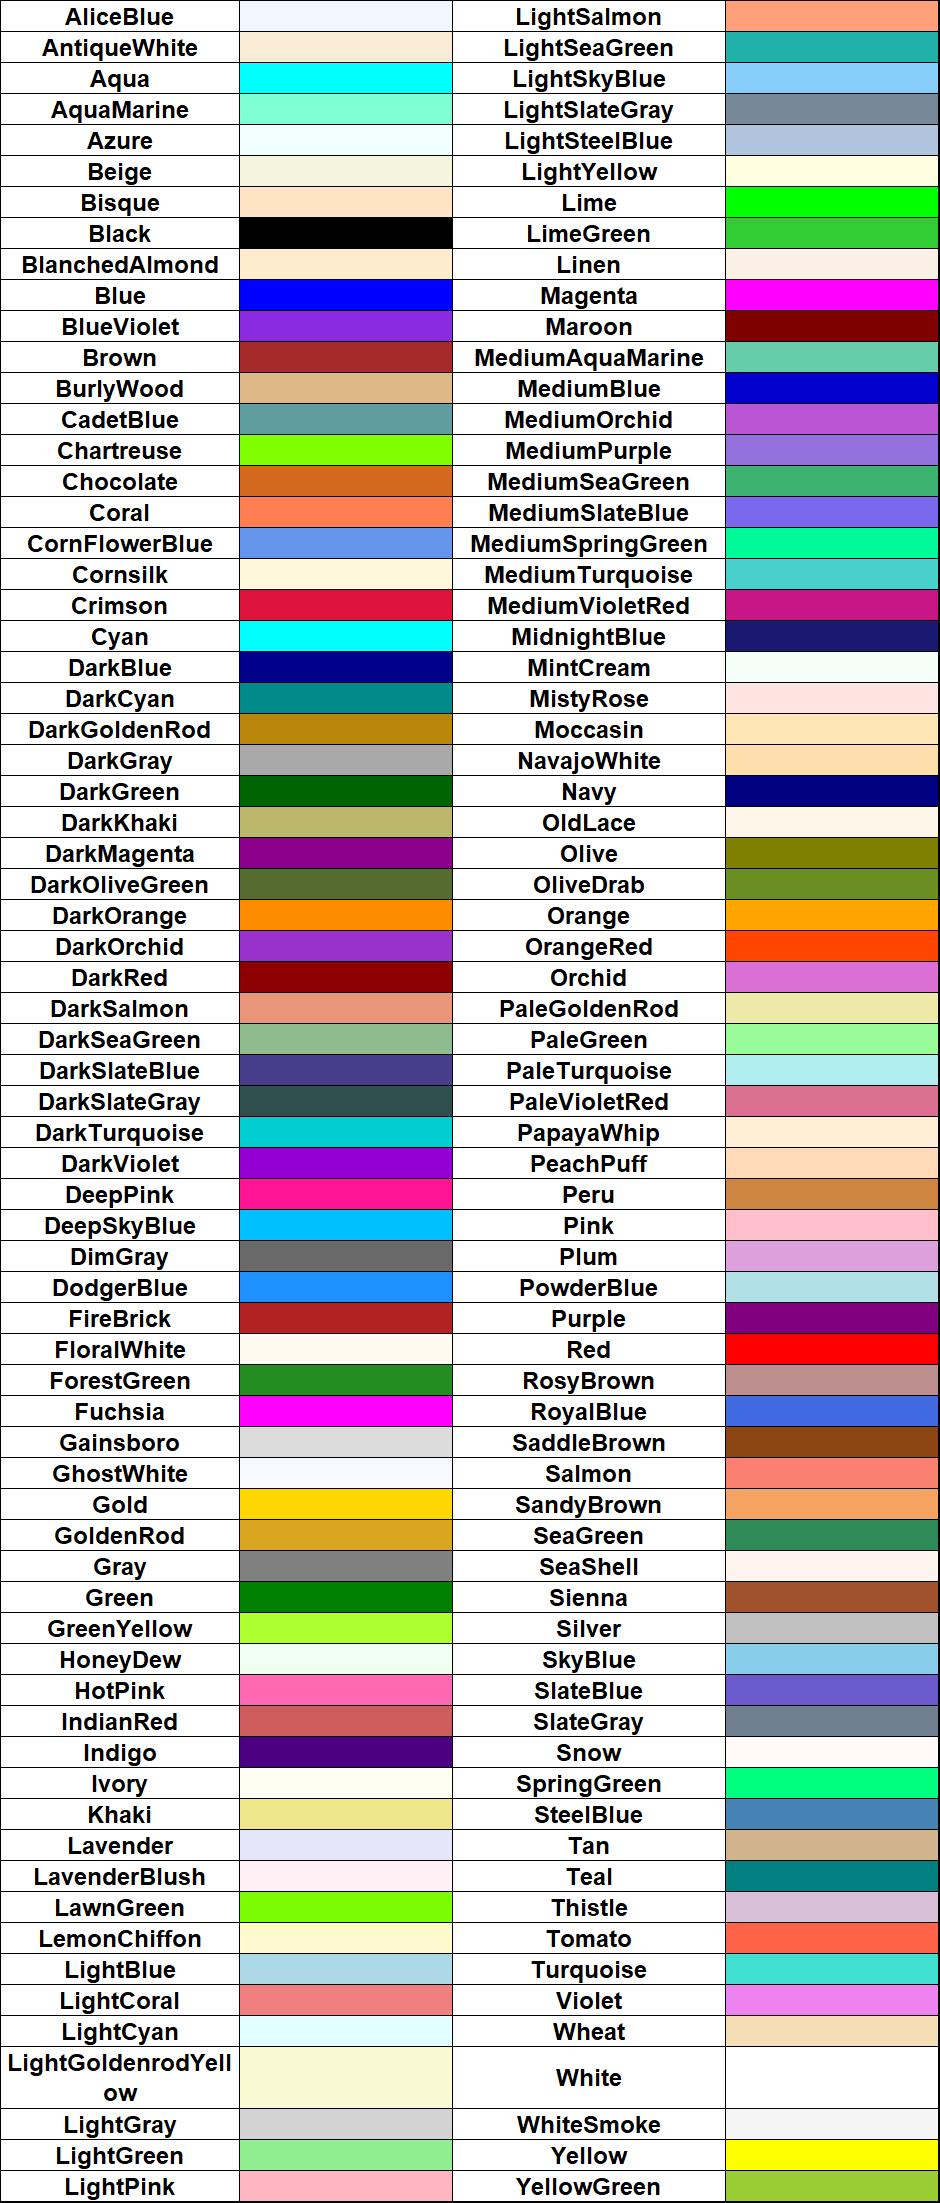
Colors
The colors can be defined with the color names, RGB,HEX,RGBA,HSL or HSLA values. I give the HTML colors` names and their appearance in the table below. HTML supports 140 different color names.
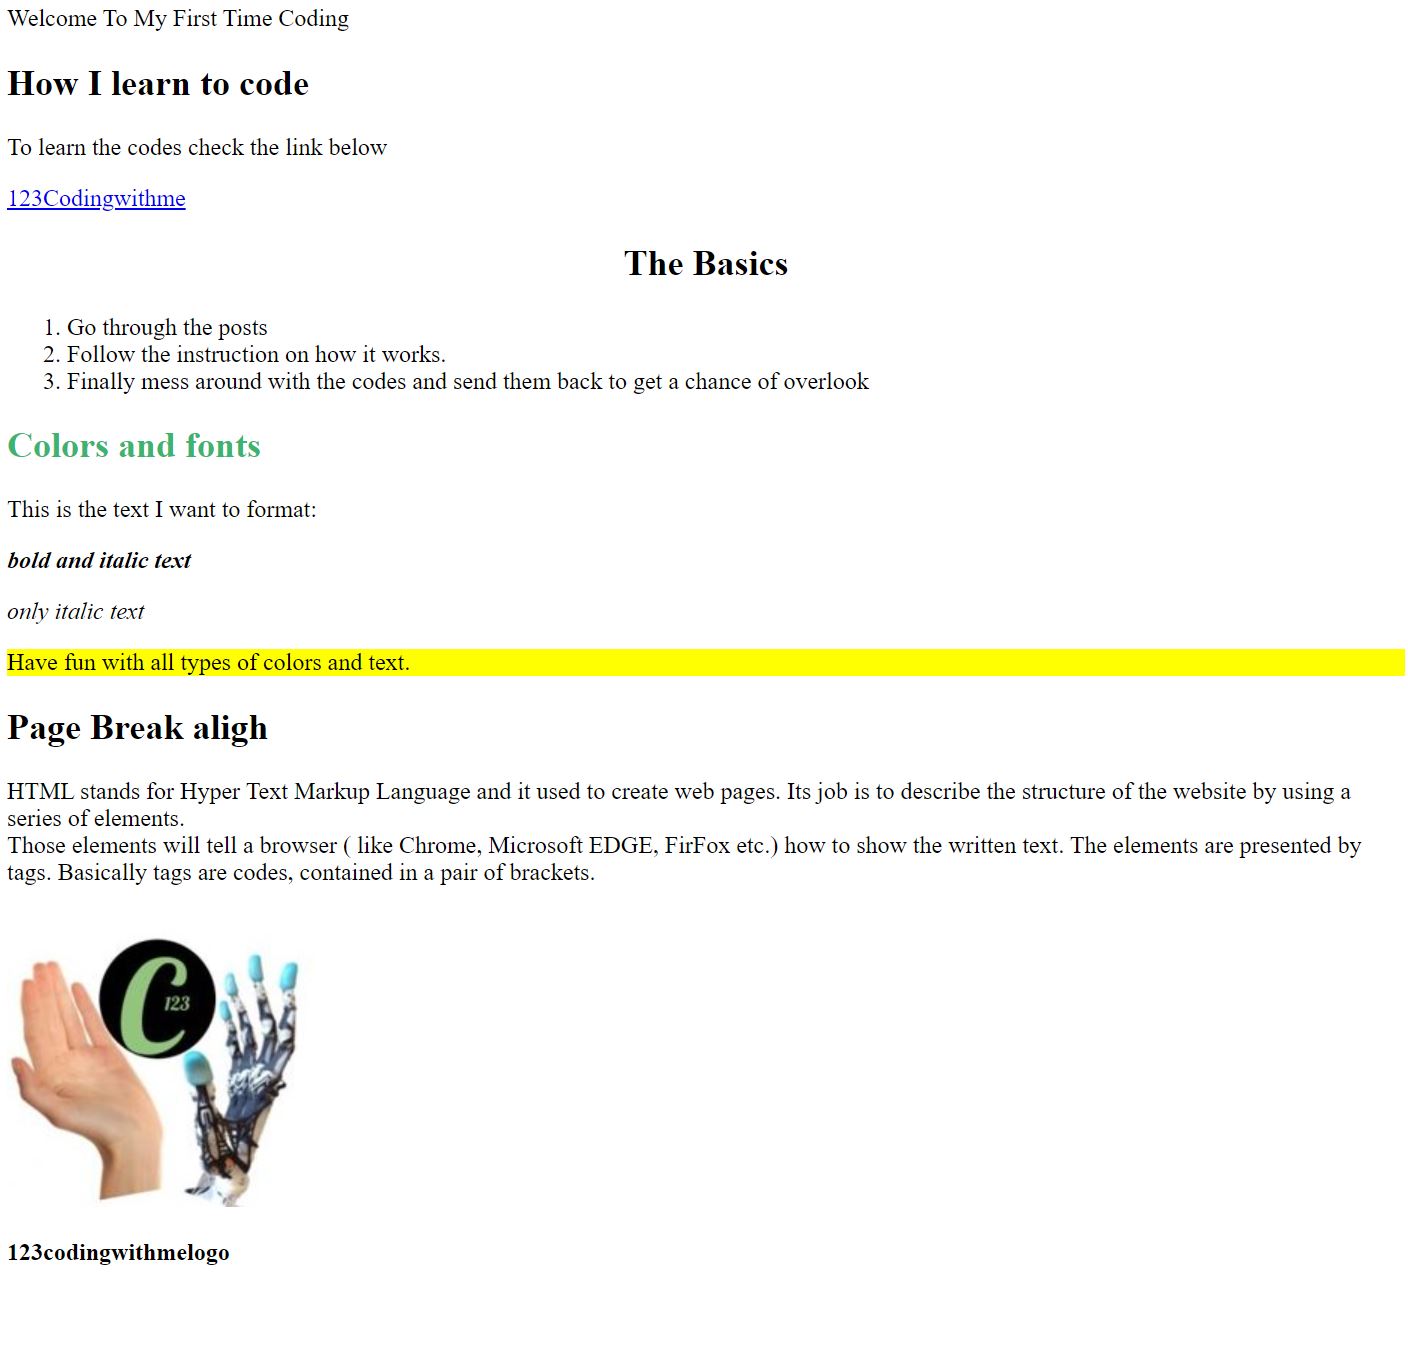
HTML Project
I compiled a HTML document to show you how to utilize some of the commonly used HTML tags, attributes and anchors to create a simple website. You can find it under projects from the menu. When I open my HTMLproject.html file in any web browser, it looks like following;
You can learn more about HTML coding from different resources. It is really simple and fun learning. I hope what I shared will help you to have a basic understanding and make you willing to learn more.
In my next post, I will go through CSS in more detail, so you can know more about how to style your HTML documents in a nicer way.
